This project was submitted by one of our readers, just like you.
DIY Cross Stitch Travel Map

DIY Cross Stitch Travel Map
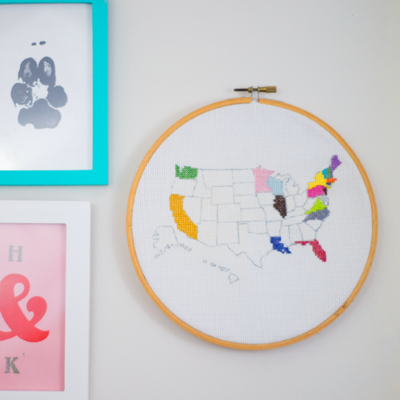
"When my wife Kristie and I were in Virginia last month, we visited one of my favorite thrift stores and I picked up some larger embroidery hoops than I'm used to (8"), thinking I'd find a project for them eventually. And this one works! This project combines two of my favorite tools: cross stitch and iron-on transfers. It's a pretty way to keep track of my travels in the United States, although a map of any country could be used (I have dreams of someday doing a worldwide map, but I'll need a bigger hoop!)."
Project TypeMake a Project
Time to CompleteIn an evening
Sewn byHand

Materials List
- An 8" or larger embroidery hoop (I wouldn't recommend going smaller; you might risk losing tiny states like Rhode Island, which even in this project is only one stitch! Sorry RI!)
- Iron-on transfer paper
- Cross stitch fabric (I use 14-count Aida)
- Embroidery thread
- Tapestry needle
Instructions:
-
Start by finding a map of the country you'd like to use – just a black and white outline of the states or territories.
-
Flip the image using Photoshop or other image software, and print on the iron-on transfer paper.
-
Follow the iron-on transfer paper instructions to transfer the image to your cross-stitch fabric.
-
Start filling in the states you've visited with stitches!