Fox Teepee, Baby Quilt with Pom Poms, Pillows
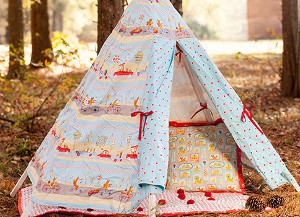
Fox Playground is just the right mix of whimsical characters and modern prints to use for your little one's room decor, clothing and accessories. Make this TeePee, Quilt with Pom Poms and Pillow for anyone that loves foxes.
Materials
- FreeSpirit Fox Playground by Dena Designs
- Coordinating Coats & Clark Dual Duty XP® all-purpose thread
For TeePee:
- 7 yards (6.4m) PWDF187.AQUAX (extra fabric is included to match the stripes)
- 1 yd (91.4cm) PWDF190.AQUAX
- (6) 5’ (1.5m) Pine Poles
- Baker’s Twine in Red
- 1 yd (91.4cm) Red Ribbon, any width
- 1 yd (91.4cm) 1/2” Double Fold Bias Tape (we made our own using leftover PWDF190.AQUAX fabric)
- White Spray Paint
For Baby Quilt with Pom Poms:
- 2 ½ Yards (2.3m) PWDF192.AQUAX
- 1 Yard (91.4cm) PWDF190.REDXX
- 1-2 Skeins of Worsted Weight Yarn for PomPoms
- 3 Yards (2.7m) Quilt Batting Medium Loft
For Pillow with flange:
- 1 1/3 Yard PWDF188.GREYX
- 1 Yard (91.4cm) PWDF190.REDXX
- 20” (50.8cm) Pillow Form
Instructions for TeePee
Note: Seam allowances are 1/2” (1.27cm) unless stated otherwise. WOF = Width of Fabric.
- Drill a hole 10” (25.4cm) from the top of each of the pine poles. Sand and paint poles.
- String Bakers twine through poles and tie, leaving about 2” (5.08cm) of room. Spread the poles apart to form the base of the teepee. There should be about 36” (91.4cm) between each pole at the base, except the front of the TeePee where the base of the opening will be about 55” (139.7cm) wide. Wrap more baker’s twine around the outside of where the poles meet at the top to keep the structure secure. Tie ends together.
- Cut 5 wedges of PWDF187.AQUAX. 37” (94cm) at the base, measure up from the center 40”(100.6cm), and 4”(10.16cm) at the top to form a trapezoid shape.
- Pin wedges with right sides together and stitch, leaving one side of wedge 1 and one side of wedge 5 free to add the Front Panel. Press.
- The Front Panel is made up of the main fabric at the top and a contrast fabric for the door curtains. Cut 2 door curtains. 28.5” (72.4cm) base, measure up from one edge perpendicular to the base to be 29” (73.7cm) tall, 11” (27.9cm) top. Each curtain should have one angled side and one straight side. Hem the straight sides to form the opening for the teepee.
- Cut 1 trapezoid for the top of the front panel out of Fox Transport. 21.5”(54.6cm) at the base, 12.5” (31.6cm) straight up from the middle and 7” (17.8cm) wide at the top.
- After your curtains have been hemmed at the centers, pin the tops of the curtains to the bottom of the Fox Transport trapezoid. Make sure the hemmed sides of the curtains meet at the center. Stitch and press.
- Pin sides of the Front Panel to wedges 1 and 5 with right sides together. Stitch and press.
- Hand sew a length of red ribbon about 8” (20.3cm) long to the sides of the front panel, where it meets the rest of the teepee, about half way down. Hand sew a length of red ribbon about 8” (20.3cm) long to the opening of each curtain about halfway down. This will allow you to tie open the curtains.
- Hem the entire bottom edge of teepee. Stitch the seam binding to the top edge of the teepee.
- Bring teepee poles back in so they are narrow enough to go through the top of the newly stitched teepee. Drape the teepee over the poles and wiggle the poles back out to their original shape. This might take some adjusting...once you move one, they all seem to move! Now you have a cute teepee! String fabric bunting around the top for a fun look!
Instructions for Baby Quilt with Pom Poms
- Cut 2 squares of the main fabric at 42” x 42” (107 x 107cm) and one square of Quilt Batting at 42”x 42”(107 x 107cm).
- Lay one square of the main fabric down, right side down. Lay the quilt batting on top, making sure to match the sides. Lay the 2nd square of fabric right side up on top of the batting, making a sandwich. Pin all layers together. Make sure that all layers are even.
- Use pins to mark where you want to tie your quilt using the pompoms. We mapped out a diamond pattern where each tie was about 9” (22.9cm) apart. You can do more or less depending on the look you like!
- Make your pompoms. We found a great online tutorial here: http://creaturecomfortsblog.com/home/2011/11/30/5-minuted-diy-yarn-pom-poms-how-to-video.html
- With a tapestry needle, thread the long ends of the yarn from your pompom through the pinned layers of your quilt and tie with a double knot on the other side. Trim. Continue in the pattern that you previously marked with pins.
Make your Quilt Binding
One side of the quilt will have a small 3/4”(1.9cm) binding and the other side will have a larger 3” (7.6cm) binding just to add a little flare.
- Cut 5 strips of PWDF190.REDXX–7”x 42”(17.8 x 107cm). Lay the strips right sides together at 90 degree angles so that their corners are matched up. Sew a diagonal line from corner to corner. When you open the strips, it should form one long piece with a diagonal seam. Trim and press. See figure below. Continue with each strip until you have one long line of binding. Press the binding in half with wrong sides together.
- We used this tutorial to attach the quilt binding. It also explains how to make nicely mitered corners! http://www.cluckclucksew.com/2013/01/machine-binding-tutorial.html.

Instructions for Pillow with flange
- Cut 1 square of the Animal Frames fabric at 21 x 21” (53.3 x 53.3cm) for the front of the pillow.
- Cut 2 rectangles of the Animal Frames fabric at 14 x 21” (35.6 x 53.3cm) for the back of the pillow.
- Hem one 21” (53.3cm) side of each of the 14”x 21” (35.6 x 53.3cm) rectangles for the back of the pillow and press. Lay the two rectangles with right sides up and overlap until they form a 21 x 21” (53.3 x 53.3cm) square. The hemmed edges will be overlapping. Pin together and stitch the overlapping edges of the square. This will be the opening for the pillow insert.
- Cut 8 rectangles out of the Dot Fabric at 3” x 26” (7.6 x 66cm) for the flange edge.
- Mark the pillow front and back at 1/2” (1.27cm) in from each corner.
- Place a flange rectangle on the edge of the pillow square. Be sure it is centered and that right sides are together. You will have extra fabric at each end of the flange. Stitch between the markings you made in the previous step. Repeat for all other sides. Press seam toward the flange.
- To make the mitered corners, lay the ends of the flange fabric on top of each other. Your pillow fabric should be bunched up to the side. Fold flanges at a 45 degree angle from the seam to the outer edge. Press.
- Stitch from the dot to the outer edge, following the fold line. Trim excess fabric. Repeat on all corners on front and back of the pillow.
- Pin the front of the pillow to the back of the pillow with right sides together. Stitch and trim the corners. Turn right side out and press. Topstitch around the Animal Frames square.
- Insert the pillow form and you have a cute pillow!
Read NextSewing Room Filing Pockets
Your Recently Viewed Projects
Marilyn B
Jan 19, 2017
This teepee is a fun project and I could see using other themed fabric to suit your little one's interests! The pompoms link goes somewhere else, but having made them before, they are time consuming, so you could buy them by the yard if you want to save time, but if you have the yarn on hand, then it can be a fun rainy day project, and perhaps have a youngster help with the winding part. A Neat project!
Cheryl E
Jan 12, 2017
This teepee is charming and easy to make. Substitute nylon rope for the bakers twine for extra sturdy support. Little children just love to have one all to themselves. Having made one, I found it necessary to attach small tabs at the bottom for each pole to slide into so the teepee keeps its shape.
Report Inappropriate Comment
Are you sure you would like to report this comment? It will be flagged for our moderators to take action.
Thank you for taking the time to improve the content on our site.


