DIY Kitchen Message Board and Organizer
Out of all the DIY message board ideas, this one is the best to make any morning with the family run smoothly.
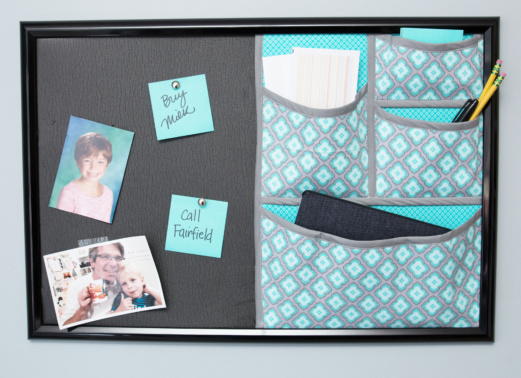
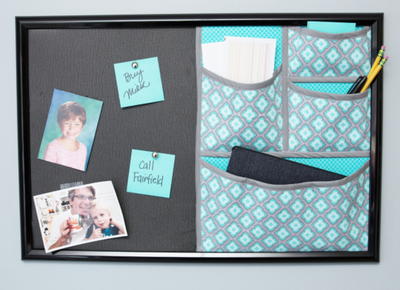
If your family is always bustling around the kitchen, trying to get out of the house on time, you need a project that will make mornings much less hectic! This DIY Kitchen Message Board Organizer is a handy solution for family communication and kitchen organization ideas. Made from a poster frame and foam board, this clever kitchen message board organizer has a space for pinning notes, from appointment reminders to shopping lists. The other side has customizable pockets that can hold anything from writing utensils to Post-It notes. Finally, this pattern is lined with decorative binding to add a pop of color and a sleek finish.
Project TypeMake a Project
Time to CompleteIn an evening
Sewn byMachine

Materials List
- Foam
- Structure
- Fabric
- Binding
- Poster frame
- Sewing machine
- Glue gun or fabric glue
- Picture hanging kit
Instructions
-
Cut a piece of foam to fit the size of your poster frame.
-
Cut a piece of fabric for the backing of your pockets. The size of this fabric will depend upon the size of and the number of pockets you will be including.
-
Iron interfacing to the back of this fabric panel.
-
Determine the size and shape of all of the pockets for your organization center. Draw out the pockets on a piece of paper, adding one inch to the measurement of each pocket.
-
Fuse interfacing to one piece of fabric that is large enough to accommodate all of the pocket pattern pieces you just drew out.
-
Cut out each Pocket from the interface lined fabric. (We chose to make the top of our pockets have an arched cut out for easy access.)
-
Fold in 1/2″ on sides and 1″ on the bottom of each pocket piece and press.
-
Cut corners to allow for a neat fold.
-
Sew (or fabric glue) decorative binding piece to the top, sides, and bottom of each pocket.
-
Layout your pockets on backer fabric. Sew the bottom and sides of each piece of pocket the backer fabric. You may use fabric glue here, too, if you do not wish to sew.
-
Finish what will be the visible edge of the backer fabric with trim or binding.
-
Place completed backer fabric with pockets on top of the foam. Tack in place with fabric glue of spray glue.
-
Place entire unit in the poster frame.
-
Add picture hanging wire to the back, and enjoy your organization center.
Read NextReusable Hanging Kitchen Towels

