How to Make a Bathing Suit Coverup
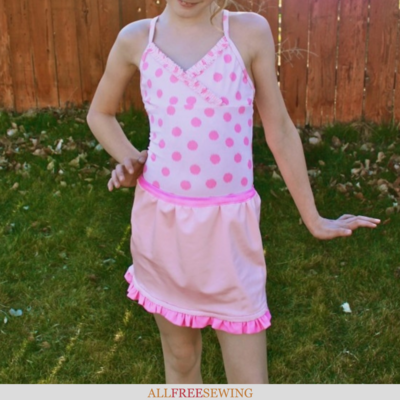
 Learn how to make a bathing suit coverup that offers a bit more coverage without sacrificing style!
This swimsuit coverup can be made in any size so you can make one for yourself and one for your daughter.
It's ideal for any gal to wear when she's not swimming. It turns your swimming suit into a full outfit that's still comfortable and lightweight.
Perfect pieces for the summer! Watch Maureen Wilson create this project in the video tutorial found at the bottom of this page.
Materials:
- Swimsuit Lycra (main skirt)
- Swimsuit Lycra, contrasting (ruffle and waistband)
- 1-2 inch wide elastic
- Ballpoint needle
- Sewing machine & thread
- Pins


Supply Tips:
You'll need stretchy swimsuit Lycra for this project. To determine how much fabric you'll need, measure your waist and multiply by 1.5. For length, measure from waist to above the knee (or wherever you'd like your hem to be). 1/3 a yard was enough for my daughter's skirt.
You'll also need a little extra fabric for the waistband and ruffle. You can use the same fabric, or a contrasting Lycra. You'll need enough to go around your waist for the band. Additionally, you'll need your waist measurement x2 for the bottom ruffle. 1/8 a yard was just enough for my daughter's skirt.
It's best to switch to a ball-point needle for this project. We'll also be using a zig-zag stitch on the seams that won't show, because that will allow for more stretch.
How To:
- Begin by cutting 4 rectangles from Lycra. These should be the length you desire for your skirt. To determine the width, measure your waist and multiply by 1.5, then divide by 2. Cut 4 of these pieces.
- Lay two of the rectangles right sides together. Do the same for the other pair. One set will be your lining, and the other will be the outer skirt. Sew each set together along the short side to make the skirt's side seam. Use a zig-zag stitch. Now you should have two long pieces with a seam in the center.
- Next we'll make the ruffle. The ruffle should be double your waist measurement, and 4 inches wide. Fold in half lengthwise, then use a 1/4 inch seam to sew the raw edge with a basting stitch. Do not backstitch.
- Gently tug on the bottom thread to ruffle the fabric. Adjust the ruffles so that the strip is the same length as your sewn skirt piece.
- Pin the ruffle to the bottom of the skirt piece, lining up the raw edges. The ruffled portion should be pointing inward.
- Then, lay the other sewn skirt piece on top, sandwiching the ruffle in between. Right sides should be together. I like to line up the center seam first and pin outward from the middle. Sew together with a straight stitch, using a 1/2 inch seam.
- Turn the skirt right side out. Tug on the ruffles to define the seam. Smooth out the fabric, and topstitch 1/2 inch away from the edge of the skirt.
- Lay the skirt flat and pin the top edges together. Sew with a 1/4 inch basting stitch.
- Ruffle the skirt fabric to fit the length of your waistband strip. Pin together, lining up the top edges. The strip should be pointing inward. Sew together with a 1/2 inch seam.
- Now we'll make the casing for the elastic. Flip the skirt over to the back side. Fold the waistband's edge under 1/4 inch, then fold once more, encasing the raw edges. Pin to the skirt. Topstitch the waistband with a 1/4 inch straight stitch.
- Cut a piece of elastic a couple of inches smaller than your waist. Thread it through the waistband casing. Sew the ends of the elastic together with a zig-zag stitch.
- Turn the skirt inside out. Pin the remaining unsewn edge together. Sew with a 1/2 inch seam, using a zig-zag stitch.
Watch the video here:
Read NextBest Fabrics for Summer

