Hips & Thighs Don’t Lie
Make off-the-rack clothing work for you with this sewing trick.

As Shakira told us, “Hips don’t lie,” and unfortunately, they don’t always fit in off-the-rack clothing either. Same goes for my fellow thick-thighs-save-lives advocates. If you’ve been blessed with some extra junk in the trunk, hips, or thighs, you’re used to the bottom of your shorts, dresses, and long shirts feeling more restrictive than a juice cleanse. It’s time to give that hot bod of yours some breathing room by adding slits to those too-tight clothes. You can also use this same method to create decorative slits in other garments like skirts or sleeves.
For this project, we’re utilizing facing. Facing is used to conceal raw edges, like a fancier version of a hem. Instead of folding the edges over twice and sewing them in place, facing is a completely separate piece of fabric that encloses the raw edge. It’s the go-to method to create any type of cutout in your clothes.
SUGGESTED FABRIC
Your garment should preferably have side seams. Grab scrap fabric that is similar to your garment in color and type. For the easiest time sewing, err on the sturdier side for your scrap fabric. The fabric only needs to be 2½ inches (6.4 cm) wide. You’ll figure out how long it needs to be in Step 1.

Materials List
- Any garment where the hem is too tight
- Pins
- Chalk or washable marker
- Ruler or measuring tape
- Facing fabric
- Seam ripper
- Scissors
- Thread
- Sewing machine
- Iron
Heads-up:
This tutorial is designed for a garment where the top half fits fine but the bottom half can’t contain your curves. If your garment fits just fine at the bottom once it’s on but you struggle to pull it on over all your curves, head on down to Zipper-ty-Doo-Dah.
INSTRUCTIONS
-
Measure and Cut Your Facing
First up, we need to determine how long of a slit we need to create and how much facing we’ll need to do that.
Try on your too-tight garment right side out and use a pin or some chalk to mark where it starts getting tight. Ideally this will be on a side seam, but if you have a seamless garment, you can choose your own adventure as to where your new slit(s) will be.
Now take the garment off and measure from the bottom hem of the garment up to your too-tight mark, then add 1¾ inches (4.5 cm) to that measurement:
Distance from bottom of garment to too-tight mark + 1¾ inches (4.5 cm)
This will be the length of your facing fabric. This width of your facing fabric will be 2½ inches (6.4 cm). (I’ve officially done the math for you one time, so you can’t get upset with me for having to do math at any other point in this book.)
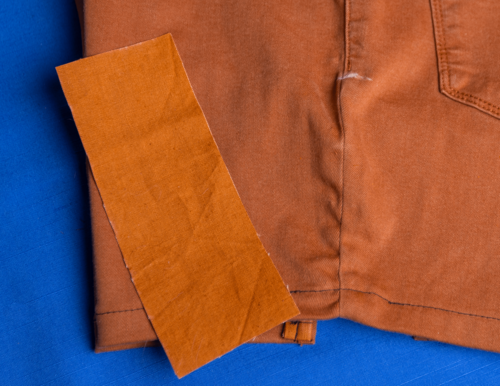
For each slit you’re creating, grab a piece of fabric that’s at least this long and wide and is similar in color and fabric type to your garment. If you don’t have an exact match for the fabric type, err on the side of a stiffer fabric. We want a decent color match because this fabric will be a little bit visible when you move around in the garment, kind of like a zit you’ve covered perfectly with your bangs until a gust of wind comes (but hopefully you think the inside of your garment is cuter than a zit).
On the fabric, draw a rectangle that is 2½ inches (6.4 cm) wide and your calculated length. Cut out one fabric rectangle for every slit you’re creating. -
Finish the Rectangle’s Edges
Now for a bit of boring work (I say as if cutting rectangles is riveting fun)—let’s finish the edges of this rectangle. If you’re dedicated to always cleanly finishing your raw edges (please tell me what being put together feels like), hem all four edges of your rectangle by folding in each side ⅜ inch (1 cm). After you’ve folded in all the edges, fold just the bottom edge over another ⅜ inch (1 cm). Iron and sew your hems in place (see Hemming & Hawing).
If you own a serger and are lazy like me, just serge around all three sides except the bottom edge. We are still going to hem the bottom edge of the rectangle (yeah, I know you thought you could get out of it)—fold up ⅜ inch (1 cm) of fabric, then fold the fabric over another ⅜ inch (1 cm). Iron and sew your bottom hem in place. -
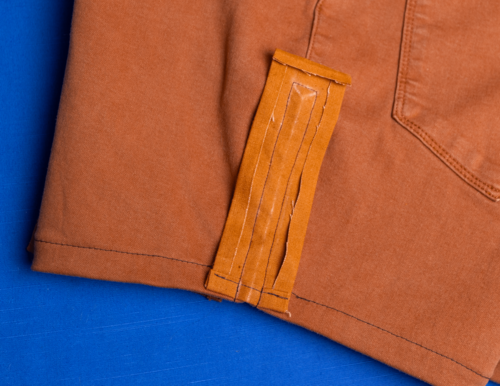
Draw Your Stitching Lines
Take your now hemmed rectangle, or facing, and lay it right side down so all the folds are visible. In the middle of our facing, we’re going to draw a ½-inch (1.3-cm)-wide rectangle that begins at the bottom hem and ends ⅝ inch (1.6 cm) below the top of the facing.
At the very bottom of your facing, mark the horizontal center, which is ⅞ inch (2.2 cm) in from either side. At ⅝ inch (1.6 cm) below the top of your facing, mark the horizontal center again. Draw a straight line connecting these two marks so they can meet up and each say, “Oh hi, Mark.” This line is the center of your facing as well as the line that will match up with your garment’s seam.
Now let’s draw the ½-inch (1.3-cm)-wide rectangle around this line. Draw a straight line ¼ inch (6.5 mm) to each side of the center line, again ending ⅝ inch (1.6 cm) below the top of your facing. Connect these two lines at the top.
Finally, measure ¼ inch (6.5 mm) down from the top of your center line and draw a little mark. Draw a straight line from this mark to each of the rectangle’s top corners to make a little triangle.
Whew, that was a lot of measuring. Take a breath, forgive me, and let’s move forward to the fun part: sewing! -
Pin and Sew Your Facing to Your Garment
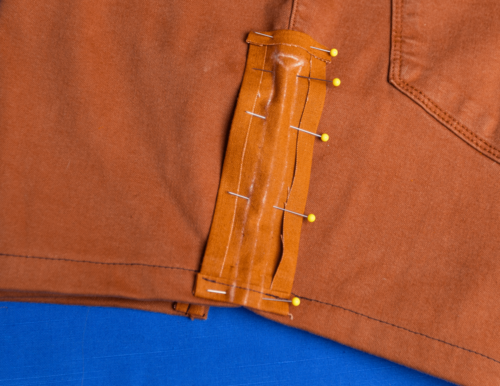
Lay your garment down right side up and lay your facing on top of it right side down so the right sides are touching. Line up the hem of your garment with the bottom hem of your facing, and line up your garment’s seam with the center line of the facing. Pin your pieces together around the perimeter of your facing.
At last, let’s sew the rectangle we just painstakingly measured and drew! Well, really it’s more of a peninsula because we didn’t draw a line at the bottom. Using a short–medium straight stitch, begin stitching from the bottom hem and sew along the peninsula you drew, backstitching at the beginning and end.
When you get to each corner of your rectangle, there’s no need to remove your garment, cut the thread, and start stitching again on the next side. Instead, when you reach a corner, place your needle in the down position so it’s holding your fabric in place. Then lift your presser foot, rotate your fabric 90 degrees so your next line is directly in front of your needle, lower your presser foot, and keep stitching. -
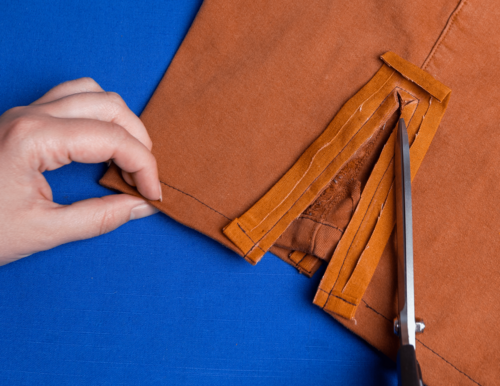
Cut Your Slit
Finally, my favorite part—cutting it all up (does this say something about me being a destructive person? Nah, surely not). Following your facing’s center line/your garment’s seam with your scissors, cut through both layers of fabric and STOP ¼ inch (6.5 mm) before you get to the top of your stitched rectangle (that’s why we drew a little mark there). If your garment has some bulky overlocked seam allowance left over on either side of your cut, go ahead and trim that off.
Now we’re making two angled cuts. From the very top of your vertical cut, cut to each top corner of your stitched rectangle, snipping as far into each stitched corner as you can without cutting the stitches. (If you do accidentally cut through them, you’re in great company. Many a time have I had to go back and restitch the stitches I accidentally snipped). Your stitched rectangle should now be sliced up into two symmetrical trapezoids on the left and right and a triangle at the top. -
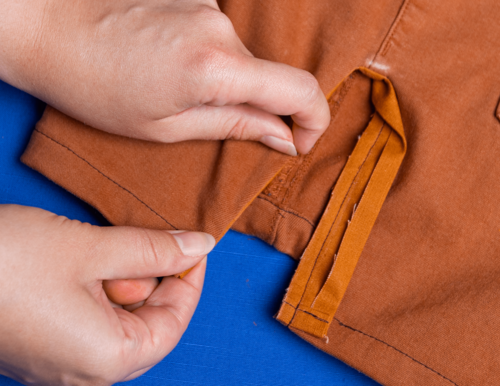
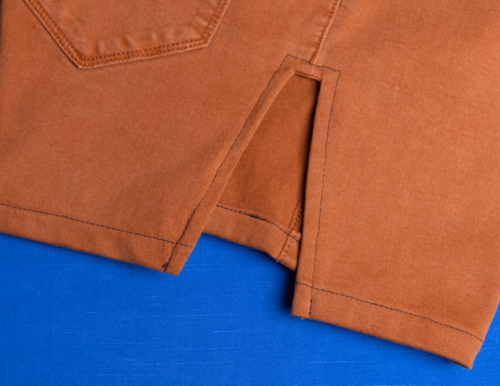
Fold, Iron, and Sew Your Facing
This is where the magic happens. We’re about to transform these weird cut-up shapes into a cleanly finished slit. Fold the top and sides of your facing to the inside of your garment by way of the cut you just made. Would you look at that? You now have a ½-inch (1.3-cm)-wide opening in your garment with beautifully finished edges. As someone who used to just slice open all of my clothes with no regard for the raw edges, I feel like a prize-winning architect when I look at the clean lines I create with facing.
Credit:
Reprinted with permission from Not Your Gran’s Sewing Book by Allie Luecke. Page Street Publishing Co. 2024. Photo credit: Kirra Jeram.
Read Next50+ Sewing Crafts That Sell Well


![Know Your Skirts Guide [Infographic]](http://irepo.primecp.com/2021/10/509029/Know-Your-Skirts-Infographic-square21-nw_Large400_ID-4536247.png?v=4536247)