Colorful Relaxation Hassock
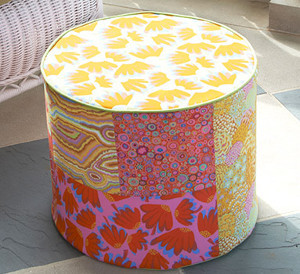
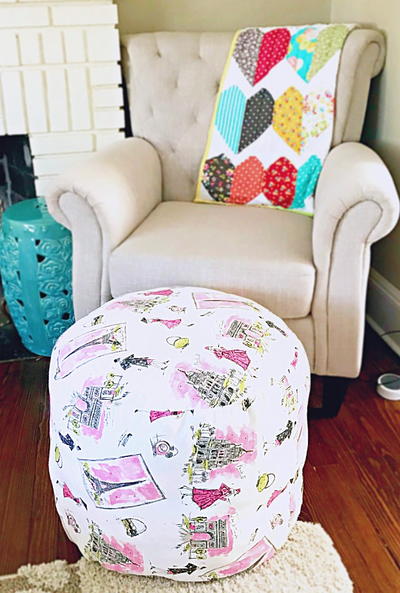
Put your feet up and relax in style with this colorful hassock made using fabrics from The Kaffe Collective by Rowan. The hassock also makes a great place to sit to read, chat, text, or just watch the world go by.

Materials
Fabric from Rowan 2014 Classics Kaffe Collective
- 5⁄8yd (.6m) CSFSESS.APPLE
- 5⁄8 yd (.6m) PWBM044.YELLO
- ½ yd (.6m) PWGP093.MAGEN
- 1 fat quarter (46m x 54m) PWGP131.YELLO
- 1 fat quarter (46m x 54m) PWGP020.PINKX
- 1 fat quarter (46m x 54m) PWGP020.GOLDX
- 1 fat quarter (46m x 54m) PWBM044.PINKX
- 1 fat quarter (46m x 54m) PWGP129 .YELLO
- 1 fat quarter (46m x 54m) PWBM045.HOTXX
- Dual Duty XP® General Purpose Thread to coordinate with fabrics
- 18” x 15” (45.7m x 38.1m) foam insert
- 2 yds ¼” wide (1.83m x .6cm) cotton cording
- 1¾ yds (1.60m) fusible fleece
Additional Requirements
- Sewing Machine with zipper foot or cording foot attachment
- Scissors
- Rotary cutter/mat/plastic ruler
- Iron, pressing board
- Freezer or tissue paper
- Pencil for making templates
- Sewing needle
Instructions
Note: All seams are ½” (1.3cm) unless noted
- Lay foam insert on freezer or tissue paper. Trace around top to make a template for top and bottom of hassock. Add ½” (1.3cm) seam allowance to template.
- Cut one round template (Step 1) from CSFSESS.APPLE for bottom of hassock.
- Cut five to six 1½” (3.8cm) wide bias strips to equal 2 yds (1.83m) from CSFSESS.APPLE to cover cording.
- Cut one round template (Step 1) from PWBM044.YELLO for top of hassock.
- Cut one 13½” x 16½” (34.3cm x 42cm) rectangle from PWGP093.MAGEN for hassock patchwork.
- Cut one 9” (23cm) square from PWGP093.MAGEN for hassock patchwork.
- Cut one 9” (23cm) square from PWGP131.YELLO for hassock patchwork.
- Cut one 9” (23cm) square from PWGP020.PINK for hassock patchwork.
- Cut one 9” (23cm) square from PWGP020.GOLD for hassock patchwork.
- Cut one 17” x 8½” (43.2cm x 21.6cm) rectangle from PWBM044.PINK for hassock patchwork.
- Cut one 13½” x 16½” (34.3cm x 42cm) rectangle from PWGP129 .YELLO for hassock patchwork.
- Cut one 17” x 8½” (43.2cm x 21.6cm) rectangle from PWBM045.HOTXX for hassock patchwork.
- Cut one 16½” x 58” (42cm x 147.3cm) rectangle from fusible fleece for patchwork lining.
- Cut two round templates (Step 1) from fusible fleece for lining hassock top and bottom.
- Following layout at end of pattern, arrange rectangles and squares.
- Sew pieces right sides together. Press seams open.
- Follow manufacturer’s instructions and fuse fleece to wrong side of patchwork piece and hassock top and bottom.
- Sew bias strips together. Press seams open.
- Center cording in bias strip and fold over raw edges of fabric to meet, wrong sides together.
- Sew cotton cording in place using a cording foot or zipper foot.
- Line up raw edges of covered cording to raw edge of hassock top (see Step 4 above). Pin securely.
- Use a zipper foot or cording foot to sew covered cording to outer edge of circle (Step 21).
- Fold hassock top in half and mark halfway points.
- Fold hassock top in half opposite way, lining up halfway points, and mark quarter points as shown in ‘Marking The Top’ illustration on next page.
- Sew short ends of patchwork piece, right sides together. Press seam open.
- Divide top edge of patchwork piece by four and mark quarter points as shown in ‘Marking Patchwork Piece’ illustration on next page.
- Pin patchwork piece to hassock top, matching quarter markings.
- Use a zipper foot or cording foot to sew hassock top to patchwork piece. Tip: Sew with hassock top facing up and patchwork piece facing toward feed dogs. This eases in fullness in patchwork piece.
- Insert foam in hassock cover.
- Turn hassock upside down so raw edge of patchwork piece is on top.
- Use a double strand of thread to sew a running stitch in middle of seam allowance on bottom edge of patchwork piece. Tip: Leave a long tail on threads for gathering.
- Gather threads so seam allowance folds over bottom edge of hassock.
- Turn under ½” (1.3cm) seam allowance on hassock bottom. Press.
- Pin hassock bottom (Step 33) in place on bottom of hassock (Step 32), and whip stitch to patchwork piece.

Read NextLia's Custom Lampshades
Your Recently Viewed Projects
Lynn K
Nov 28, 2018
Really good, detailed instructions plus lots of images make this a project that anyone will be able to make. And what a pleasure it will be to lean back on the sofa and put your feet up on the hassock that you made yourself, lol! Enjoy - you really do deserve it!!
Report Inappropriate Comment
Are you sure you would like to report this comment? It will be flagged for our moderators to take action.
Thank you for taking the time to improve the content on our site.

