How to Decorate a Fort - Pirate Theme
 In the first part of this project, Maureen Wilson showed us how to make your own kids' fort using your kitchen table. But that's not all!
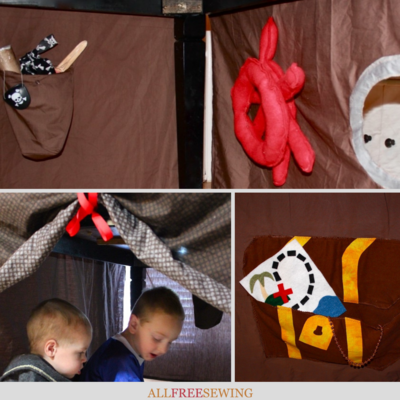
Now, learn how to decorate a fort, completely pirate-themed! Use this children's pirate sewing pattern for great ideas. Learn how to create pockets for loot or eye patches, binoculars, and swords.
Make portholes for your kids to look through. You will even learn how to make other awesome embellishments like treasure chests, treasure maps, and a 3D helm!
You can also find the video tutorial at the bottom of this page, just scroll past the written instructions and images.
Sign Up For More Free Patterns >>>
Materials:
- Clear vinyl
- Iron-on adhesive
- Velcro
- Misc. cotton, fleece, & flannel fabrics
- Large button
- Stuffing
- Self-adhesive battery light
- Hot glue gun
- Wooden dowel

Adding A Window/Porthole:
- Trace a plate on a non-fraying fabric. Trace a smaller circle within the first. Cut out both circles to make a donut-shaped frame. Make two of these window frames.
- Cut a circle out of your fort wall that’s the same size as the interior circle you traced. Cut a piece of vinyl the size of the large plate. Lay the vinyl on the inside of the fort wall and pin in place. Sew around the edge of the vinyl with a zig-zag stitch.
- Pin one window frame to each side of the wall, encasing the vinyl. Snipping the window frame once will make placement easier.
- Sew around the inside edge of the frame with a zig-zag stitch, then sew around the outer edge of the circle.
Adding Background Embellishments:
- Use double-sided iron-on adhesive to add background embellishments. Use quilting cotton or flannel, not fleece or felt: those two fabrics can melt under the heat of an iron.
- Sketch out the shape of the object on the paper side of the iron-on adhesive. Cut it out with paper scissors. Press it, without steam, onto the wrong side of your fabric. Cut it out. If you’re using fabric scissors for this, be careful not to cut the paper, because that will damage your scissors.
- Peel off the paper backing, then iron it onto your fort. You can leave it as-is, or you can add a decorative zig-zag topstitch.
Making An Interactive Pocket:
- Next I’ll show you how to make a pocket. I’m making a treasure chest, but you can make it any shape you’d like. Follow the steps of sketching and ironing.
- Then we’ll make a second shape just like the first. Use the paper backing as a template, and pin it to another piece of the same fabric. Do not add any adhesive to this piece. Cut it out, then cut along the middle so that this shape is in two pieces.
- Layer the cut pieces on top of the original shape. Pin together. Sew along the three sides of the bottom half, and along the top edge of the upper half.
- Embellish it as desired, and add it to the wall of your fort. It’s the perfect place to store treasure!
Fold-Down Accessories:
- Every pirate needs a plank to walk! Cut a rectangle of felt and pin it along the bottom edge of one wall. Sew in place.
- Then add a piece of Velcro along the free edge. Sew a coordinating piece of Velcro to the outside wall of the fort.
Turning Captain’s Wheel:
- It wouldn’t be a pirate ship without a Captain’s Wheel. Fold a piece of fleece or felt in half and cut two donut shapes.
- Pin together and sew the inner circle with a zig-zag stitch. Then sew around the outer ring, leaving a small hole for stuffing.
- Now we’ll make the spokes. Again, fold your fabric in half, then cut 3 strips about 18 inches long, for a total of 6 pieces. Round off the corners.
- Sew to make 3 sets, leaving a hole in each one for stuffing.
- Fill all the pieces, then sew the holes shut.
- Criss-cross the three spokes, then sew to the wheel in the center. Tack down the spokes as well. Sew onto the wall of the fort with a large button, and the kids will be able to twist the Captain’s Wheel.
Making a Flag or Sign:
- Fold a piece of felt in half, and cut out a pennant shape.
- Add felt embellishments to the flag.
- Then unfold the flag, add hot glue to the center, and insert a wooden dowel.
Making Themed Toys:
- You can make a few toys for even more imaginary fun. You can make a treasure map out of felt.
- Make a spyglass that shows an ocean scene. Print out sea-themed clipart, then tape the paper over the end of a paper towel tube. When your little seafarer peeks in, he’ll be able to shout “Land Ho!”
Finishing Touches:
- The sheet I bought at Wal-Mart came packaged in a matching fabric pouch, so I might as well sew it to one of the walls to store pirate garb.
- Also, this ship really needs a sail. Weigh down a cereal box with a soup can. Tape the box shut and wrap it. Cut a large rectangle of white felt. Hot glue one edge along the bottom of the box.
- Drape the felt over your arm to create a billow in the sail. Add hot glue to the center of the box, and adhere the felt. Repeat to make a second billow, and hot glue the felt to the top edge of the box. Trim off any excess fabric. You can poke your flag through the top.
- Finally, consider purchasing a battery-operated light. This one came with self-adhesive Velcro so it won’t damage my table. Place it on the underside of the table and the fort becomes a cozy place to read books.


Watch the video here:
Read NextSunny Day Girl's Skirt

