How to Blanket Stitch by Hand
From embroidery to appliques to hemming and more, the blanket stitch is a tasteful way to put pizzazz in your projects!
With an intricate toothed design, gentle texture, and ability to fasten anything in place, the blanket stitch is a go-to for many embroidery projects. You might have seen it along the edge of an applique or blanket and thought to yourself, I'm no professional sewist. I'll never be able to make something like that!
Good news: you couldn't have been more wrong!
Though the blanket stitch looks like an expert-level technique, you can learn to do it in minutes with this step-by-step guide on How to Blanket Stitch by Hand. You don't need a sewing machine to give your projects a polished look.
This tutorial will show you, both with the video above and the written instructions and tips below, what the blanket stitch is used for, how to start and end the blanket stitch, and some ways you can creatively apply the blanket stitch to all your sewing projects.
Before you go embrace your embellishment euphoria, we even have a list of handy projects for you to test your new skill on, from decorative dish towels to sporty pencil cases. Find a pattern for everyone in your life! Since you'll be a hand blanket stitch aficionado, any project you take on will be a piece of cake.
By the end of this comprehensive tutorial, the blanket stitch will be your go-to technique for embroidery, finishing raw edges, and attaching appliques to your pieces.
Sign Up For More Free Patterns >>>
With a blanket stitch, you can adorn any sewing pattern with some extra flair. Now it's time to give your outfits some extra pizzazz, too, with a list of free purse patterns! You'll never look so trendy than with this downloadable ebook guide:
What is the Blanket Stitch Used For?
- Decorative embroidery. This stitch, because it of its geometric toothed design, texture, and versatility, is often used to add a little panache to sewing patterns.
- Finishing a raw edge, especially on fabrics that are too thick to be hemmed. This way, the embroidery floss becomes the outer edge of the fabric instead of the unfinished fabric itself.
- Attaching an applique. Whether you attach the applique with fusible webbing first or use the blanket stitch to do all the heavy lifting, this stitch helps keep material designs in place with decorative flair.
How to Do a Basic Blanket Stitch by Hand:
The blanket stitch is a necessary skill for any aspiring embroiderer. Classic, geometric, polished, and lovely, this stitch is assured to take any sewing project to the next level. Sew it in a loop with colorful embroidery floss, and you'll have a gear-shaped spiral that would look elegant on any pillow.
Apply it to a quilt, and your patchwork masterpiece will give off a country vibe that will liven up any bed or armchair. However you use your blanket stitch, it'll be a technique you time and again to give your projects a plucky panache.
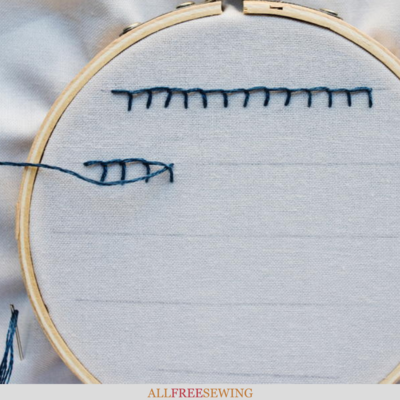
Note: In the instructions below, the "main line" refers to the straight line of thread created by the top of the stitch. The "teeth" refer to the stitches that point perpendicularly downward from the main line, looking like the teeth of a comb.
-
Thread needle and knot one end of the thread.
-
From the back side of the fabric, bring the needle through on the main line of your sewing and pull it taut. This is the line from which the “teeth” of the blanket stitch will descend.
-
Place the needle diagonally below and to the right of the main line, one stitch’s length away from your first puncture. Where you place this stitch will determine where the bottom of the “teeth” of the blanket stitch will land. Push the needle towards the back of the fabric. Pull the thread, but not all the way. There should be a small, loose loop of thread on the front side of your fabric.
-
Position the needle one stitch directly above the last puncture. It should lie on the main line of your sewing. Push the needle through the back of the fabric to the front, hooking it underneath the loop from your last stitch.
-
Repeat steps 3-4 down the main line until you are satisfied with your stitch.
-
To finish a blanket stitch, push the needle through to the back of the fabric one stitch's length to the right of the last puncture on the main line. Pull it taut.
-
Turn the fabric so you are facing its back. Bring the needle underneath the tooth of your most recent stitch, from right to left (the needle should be directed away from your most recent stitches). Your needle should not pierce the fabric. Don’t pull the thread completely through. Leave a loop jutting to the right of your last stitch.
-
Bring your needle through the loop you created, from right to left again, and pull it tight.
-
Repeat Steps 7-8 for a sturdier double-knot.
-
Clip any extra threads.
How to Sew a Corner with a Blanket Stitch:
Though it may seem like a daunting task, few sewing skills are as simple to master than sewing a corner with a blanket stitch.
-
When you reach a corner, sew the blanket stitch normally using the Basic Blanket Stitch tutorial. For Step 3, place the needle one stitch’s length away from the corner, diagonally inward. This “tooth” should be equidistant from either edge of the corner.
-
Your next "tooth" should fall perpendicularly below the next edge of the fabric. Continue the blanket stitch normally.
How to Finish a Raw Edge with a Blanket Stitch:
Oftentimes our coziest projects can pose the most problems. When your blankets, sweaters, or quilts have an edge that is too thick to hem, don't worry about abandoning your project with an unfinished edge! The blanket stitch is a handy way to cover, protect, and add a polished feel to raw edges. Your fabric doesn't even have to be thick to finish it with a blanket stitch. Whether you're working with a scrap of felt or a yard of wool, you can use the blanket stitch to add an elegant edge.
Note: The stitch's main line will fall on the edge of the fabric, and the "teeth" will extend inwards around the perimeter of the fabric.
-
Thread needle and knot one end of the thread.
-
From the backside of the fabric, bring the needle through one stitch below the edge of the fabric. Pull it taut. Unlike a basic blanket stitch, this first puncture will determine where the bottom of the “teeth” of the blanket stitch will land.
-
Looping the thread over the edge of the fabric, push the needle through the same spot as your first puncture. You should be pushing the needle from the back of the fabric to the front of the fabric. Don’t pull the thread completely taut. There should be a loose loop arching over the top of your edge.
-
Pull the needle through the loop, from left to right (the opposite direction of your blanket stitch), and pull the thread taut.
-
Bring the needle from the back of the fabric one stitch to the left of your first stitch. This will be the position of your second “tooth.” Do not pull the thread taut. Just like in step 3, you should leave a loose loop over the top of the edge.
-
Put the needle upwards through the loop and pull it taut.
-
Repeat Steps 5-6 until you have finished the length of the raw edge.
-
Once you have finished the entire edge of the fabric and have reached your first stitch, pull your needle underneath the “tooth” of your first stitch and pull it taut.
-
Push your needle from the front to the back of the fabric in the same place as the bottom of your first “tooth.”
-
Turn the fabric so you are facing its back. Bring the needle underneath the thread of your first stitch, from right to left (the needle should be directed towards your least recent stitches). Your needle should not pierce the fabric. Don’t pull the thread completely through. Leave a loop jutting to the right of your first stitch.
-
Bring your needle through that loop, from right to left, and pull it tight.
-
Repeat Steps 8-9 for a sturdier double-knot.
-
Clip any extra threads.
How to Apply an Applique with a Blanket Stitch:
When you want to add decorative material patterns to your main project, the last thing you want to do is sew it on with a drab stitch. With a blanket stitch, you can attach your appliques in style. Sew around the edge of your appliques for a no-slip fastening that will add texture, detail, and attractiveness to any project. In a matter of minutes, any applique will look professionally attached!
Note: The edge of the applique will be your main line. The “teeth” of the blanket stitch will descend inwards on the applique.
-
Fasten your applique to your main fabric in the desired position. You can use pins or fusible webbing for this step.
-
Thread needle and knot one end of the thread.
-
From the back side of the main fabric, bring the needle just at the edge of your applique, which will be your main line, and pull it taut.
-
Place the needle one stitch directly below main line, one stitch’s length away from your first puncture. Where you place this stitch will determine where the bottom of the “teeth” of the blanket stitch will land. Push the needle towards the back of both fabrics and, once it can reach, push the needle through the same spot as your first puncture. Pull it taught.
-
Place the needle diagonally below and to the right of the main line, one stitch’s length away from your first puncture. Push the needle towards the back of both fabrics and, once it can reach, push the needle through the main line, one stitch’s length to the right of your first puncture. Pull the thread, but not all the way. There should be a small, loose loop of thread on the front side of your applique.
-
Hook your needle underneath the loop, and pull it taut.
-
Repeat steps 5-6 along the entire length of the applique.
-
To finish a blanket stitch around an applique: once you reach your first stitch, push your needle through the bottom puncture of your first “tooth,” and, once it can reach, push the needle through your first main line puncture. Don’t pull the thread completely through. Leave a loop jutting to the right of your last stitch.
-
Hook your needle underneath the loop, and pull it taut.
-
Push the needle to the back through the second puncture on your main line. Stitch a knot at the base of the thread on the back of your main fabric.
-
Clip any extra threads.
Variations on a Blanket Stitch
In this Craftsy tutorial, How to Sew a Blanket Sitch 3 Ways, author Sherri Sylvester explains the possible variations of the blanket stitch. These options include...
-
Varying the "tooth" depth of each stitch so that your blanket stitch looks like hanging icicles.
-
Grouping the teeth of the blanket stitch, such as in 3's or 4's, to create a pattern of "teeth."
-
Interlocking two rows of blanket stitch so that the "teeth" of one stitch fall between two "teeth" of the other.
Embroidery and Applique Projects
Now that you have mastered the blanket stitch, it's time to put your needle know-how to work with these super simple embroidery and applique projects! Add some texture to a throw pillow or a colorful edge to a quilt.
Attach your son's or daughter's favorite movie characters to their clothes, or put a patch on a throw pillow to get a rustic country aesthetic. Embrace your sewing bliss with these easy projects! Your friends and family are sure to be astounded by whatever blanket stitch pattern you apply.

Never let your Halloween home decor fall flat again with this Wicked Witch Silhouette Pillow! Add an embroidered edge to the applique, and this pillow will be the spookiest pillow on your sofa this season.

Nothing is worse than being in the bathroom and running out of toilet paper. This Toilet Paper Holder is an ingenious and decorative way to solve your TP troubles in style.

Embroidered, intricate, and altogether adorable, this Matryoshka Needle Case Tutorial will be your new favorite sewing accessory. Keep your sewing supplies at your fingertips with this blanket stitch-friendly project.

Dust off your outdated tees for a tutorial that will have your closet looking chic in no time! With a little embroidering, you can transform any old shirt into a breathtaking Bohemian statement piece.

Handy and durable, messenger bags are no-brainers for anyone carrying a little extra cargo. With this pretty pattern, you can add some feminine flair to your bag with embroidered flowers!

Budget-friendly and handy as can be, this Upcycled Denim iPad Sleeve is the perfect gift for the tech-savvy person in your life. Add some heart-shaped appliques, and this sweet design is sure to show all your love.

Machine washable, homemade, and precious, this La Petite Tour Eiffel Rice Bag will be your family's new favorite heating pad. The Eiffel Tower applique will have you dreaming of Paris while you soothe your aches away!

It may not be on your sleeve, but your heart will most definitely be on display with this Sewn with Love Appliqued Tee! This simple heart design will add a sweet style to any of your shirts.

Piecework patterns never looked so good than with this throw pillow! With a pleated edge and an enchanting sailboat applique, this Nautical Pillow Pattern will bring the calm of the ocean to any room you put it in.
Read NextSimple Quilted Coaster Tutorial