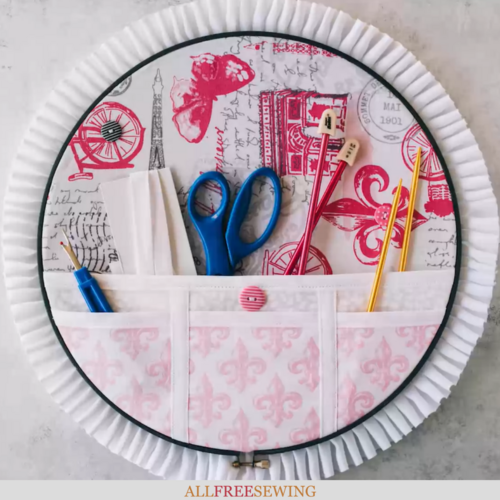
Embroidery Hoop Organizer (Video Tutorial)
Follow this wall pocket organizer pattern to create a gorgeous decoration that's also useful for holding all of your crafting supplies.

You can never have too many organizers, especially if you are an avid crafter. This DIY sewing organizer is all you need when it comes to organizing your sewing supplies.
Learn how to make one yourself with our Embroidery Hoop Organizer video tutorial.
This is a super easy sewing project that actually requires limited sewing experience, and you can put it together in just one night.
You won't believe how easy it actually is to make this wall pocket organizer out of an embroidery hoop.
Just watch the sewing video tutorial to see how you can put together your own and decorate your house with it!
Sign Up For More Free Patterns >>>
Skill Level: Easy
Project Type: Make a Project
Time to Complete: In an evening
Sewn By: Both hand and machine
Wall Pocket Organizer Video Tutorial
Click play on the video box below to watch our video from Mary Beth. She'll show you how simple making your own DIY wall organizer from an embroidery hoop actually is.
This browser does not support the video element.
Embroidery Hoop Organizer
Materials Needed
- 12" or desired size embroidery hoop – sanded and stained if desired (materials needed: medium coarseness sanding block and paint of choice)
- 1 package extra wide double fold bias tape
- Ruffle (optional)
- Embellishments (like beads and buttons)
- Needle and thread (to sew on embellishments)
- 2 or more colors of coordinating fabric. Fat quarters work well, otherwise at least 14" square for the main color and 7" x 14" for pockets
- Glue Dots
- Ruler
- Scissors
- Hot glue gun
Embroidery Hoop Organizer Instructions:
- Stain embroidery hoop if desired, making sure to sand off the finish first. You can also choose to paint it whatever color you would like.
Note: If painting, do this at least 24 hours before the rest of the project, as you want to be sure the hoop is dry.
- Press your fabric. Roughly arrange the fabric to decide where you want it over the hoop. You can use the hoop to test the appearance.
Use one or two glue dots to tack the fabric in place on the hoop when you know how you want it arranged.
- Determine if you want pockets on your organizer. The number and size of pockets is up to you.
Lay the fabric across the bottom to decide the details of your pockets. The organizer design featured in this tutorial has two pockets.
- Apply bias tape across top edge of what will be the shortest pocket, making sure the bias tape extends at least ¾” on either side of the hoop.
Note: Where you want the pockets, how you want to divide the pockets, and other details come down to what you want and how you will be using the organizer.
- Lay the bottom pocket on top of the upper pocket, pin together with any vertical bias tape (for pocket division). Use a ruler to make sure measurements are correct.
- Press bias tape open; topstitch it up the center of both pockets (or as appropriate for your number of pockets).
- Apply bias tape across top edge of the upper pocket, making sure to also enclose the top raw edge of the bias tape pocket divider.
- If needed, rearrange the largest/back piece of fabric over the inside hoop, making sure it's taut.
- Arrange assembled pockets over the large piece on the inside hoop, making sure it's even and free of wrinkles.
- Place outer hoop over fabric and the inner hoop with the screw at the bottom.
Make sure the fabrics are even, smooth, and taut. You can tug on the fabrics while inside the hoop as long as it is not tightened.
Once everything is centered and as taut as possible, tighten the screw on the bottom as much as it can go.
- Trim all fabric up to the edge of the hoop, as close as possible.
- If adding ruffle edging: Using hot glue, apply ruffle to the back of the assembled hoop, folding both raw edges towards the back and overlapping the end of the ruffle over the beginning.
Note: Only glue a few inches of the ruffle at a time to assure it's correct.
If no ruffle is desired: Run a bead of hot glue around the back of the assembled hoop.
- Embellish if desired with beads, bows or charms, either sewing them on by hand or adhering them with glue dots/hot glue.
Want More?
26+ Unique Things To Do With Embroidery Hoops >>
What is your favorite tool in your sewing room?

