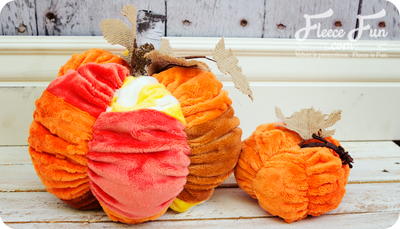
The Patchwork Pumpkin

"Pumpkins are a fall decorating staple. This cute pumpkin is designed to be made from several different fabric scraps (hello scrap buster!) patchwork. It’s a simple pattern with adorable results! One of my favorite things about this piece – if my two year old get his hands on it, it’ll be fine. In the example I used cuddle fabric, but any number of fabrics will work with this free pattern. Cotton, burlap, felt and yes even velvet."
Project TypeMake a Project
Time to CompleteIn an evening
Sewn byHand

Materials List
- Fleece Fun’s Patchwork Pumpkin Pattern
-
1/4 yard fleece, cuddle or minky fabric
- Thread
-
Needle
-
Scissors
- Stick (bark like paper can be found in the floral section of a hobby store) burlap leaves (floral section of hobby store) batting/ beans or other filling
Instructions
-
Print up and cut out pattern pieces. In the pattern example I used 4 different fabrics, a minimum of 3 is suggested. Cut 6 of each pattern pieces 1, 2, and 3 from different fabrics. You will make a total. Note that wedge of the pumpkin is not symmetrical – be sure to mark the top with a pin.
-
Layout each wedge, alternating the fabrics in a pleasing manner. Then using a half in seam allowance sew pieces 1 to 2 and 2 to 3 to form a wedge. Continue until you have made all 6 wedges.
-
To give the fabric pumpkin that nice ribbed look, we’re going to ruche the sides of each wedge. Sew a basting stitch along each side of the wedge, then gather. Repeat on all wedges. Note: Be sure to leave a pin at the top of each wedge to you know which is the top (piece 1).
-
Pin and sew the wedges together, using a half inch seam allowance. Be sure to pin the tops ( the end marked with a pin) together. Pin along the side and sew. Continue to build the pumpkin all the way around. When you sew the last wedge to the first wedge, leave a 2 to three inch gap at the top for turning.
-
Turn pumpkin right side out. Stuff to desired firmness. place stem in the top and hand stitch the gap shut and secure the stem. Add leaves if desired. You’re finished!
