Types of Clothing Repair
Looking to repair torn clothes yourself? Learn about the different options for DIY clothing repair and choose the right one for your problem.
The number of queries related to DIY clothing repair is immeasurable. Whether you've never sewn, are a beginner, or even an expert, each type of clothing repair requires its own unique touch and understanding.
With this guide, Types of Clothing Repair, learn everything you need to know to fix your garments at home.
There are several kinds of repairs that can be made to torn or damaged clothing. All too often our garments can tear, zippers can break, and pinholes can grow larger.
Being able to fix your own clothing is a valuable skill that will save you money over the years. Additionally, it will reduce your carbon footprint by keeping more discarded items out of landfills!
Here are a few basic types of mending that might be helpful, along with instances when each kind should be used in order to avoid further damage.
Looking for more? Sign up for one (or more) of our awesome free newsletters!
Hand Sewing Clothing Repair
The most common way to fix a torn garment is to sew it by hand. Using an all-purpose hand-sewing needle and thread is a traditional method that has stood the test of time. If the damage is a small tear in the fabric, use a similar color and weight thread and carefully stitch it closed.
Use the surrounding fabric to close the hole- without sewing in any wrinkles or folds! Hand-mending might take a little while, but if done correctly it should hold up with wear and washing. The garment may never look "perfect" or "new" again, though it will be wearable and the sewing will prevent the hole or tear from widening.
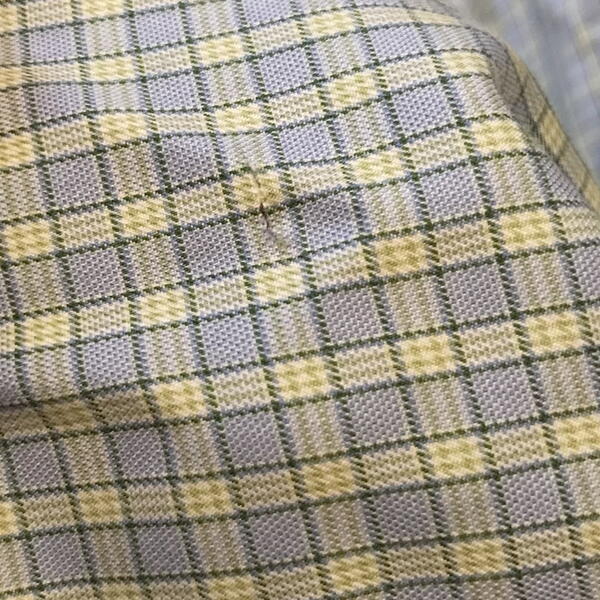
Image below shows a torn shirt.

Image below shows a torn shirt repaired by hand.
Patching Clothes Repair
A fabric patch over a hole or tear is another classic way to repair clothing. Patches aren’t very discrete, although sometimes that is part of the fun!
This technique works best to reinforce areas that frequently wear out (like elbows on shirts), as well as to fix larger holes that can’t simply be sewn shut. Patches can be either homemade or store-bought, and there are a few options for attaching them.
Image below shows an iron-on patch on a shirt.
Patches that are made at home from scrap materials should be as close to the fabric being repaired as possible, or even a little thicker in weight.
Patches can be applied by hand or with a sewing machine, depending on the garment. They can be sewn onto the top of the fabric only, the bottom of the fabric only, or placed on both sides.
Extra tip: When making your own patches it might be necessary to overlock the edges so they don’t fray.
Image below shows an iron-on patch on a shirt being ironed.
Pre-made (store-bought) patches are usually either sew-on or iron-on, with the latter using a fabric glue that melts when heated. Whichever kind you choose might depend on the tools that are available at the time.
Sew-on patches can take longer to attach, but may stay on more securely than the iron-on kind (if you plan to wash and dry the garment frequently).
Extra tip: Place a scrap piece of fabric below and above when attaching an iron-on patch to keep any glue from sticking to the iron and board.
Types of Clothing Repair: Fixing Zippers
A broken zipper can make many garments hard to wear, so fixing them is important. Sometimes they can simply be removed and replaced or just need the pull part changed out, but other zippers are more complex.
If you have a lot of sewing experience it might be possible to fix a broken zipper, but more complicated types may need to be taken to a tailor. This applies to items with thick metal closures and those that are on delicate or expensive garments.
Extra tip: If you decide to fully replace a zipper it should be the same kind that was originally used (change out an invisible zipper for another invisible zipper, etc.).
Image below shows torn stitches on a zipper.
A tear in the thread that runs along a zipper doesn’t usually require a whole replacement. This problem can typically be fixed by hand-sewing a few similar stitches along the line, or by using a sewing machine if there is a long area that needs repairing.
Match the thread color as closely as possible to help make the repair less noticeable. Also, be sure to backstitch at the beginning and end, and always clean up any stray threads that remain.
Image below shows torn stitches on a zipper after trimming threads.
Image below shows machine-sewn repaired stitches on a zipper.
Gluing for Clothing Repair
Using fabric glue to repair torn clothing can also work, though usually as a temporary fix. For instance, glue might be the best option to quickly repair a damaged costume right before wearing it.
Image below shows a torn shirt before gluing.
Glue will require some drying time in comparison with other fixes, so keep that in mind. In some cases, fabric glue can be used to close up a tear (if the methods already mentioned above in this post aren’t possible). This works best when the garment will not be washed and worn repeatedly.
Image below shows a torn shirt just after gluing.
Image below shows the back of torn shirt after gluing.
Additional Resources
For additional help, take a look at these helpful resources and tutorials. Everything below is going to help you master basic clothing repair techniques, speed up your processes, and get you on the right track for becoming a masterful tailor.
- How to Use a Needle Threader
- How to Use a Seam Ripper
- Sewing Tools & Equipment
- How to Sew Buttons
- Hand Sewing Needle Sizes/Types
- Machine Sewing Needle Types
- What Types of Thread to Use
- Types of Fabric Glue
- How to Sew a Ripped Seam
- How to Fix Runs in Tights
- How to Remove Stitch Marks From Fabric
- How to Fix a Hole in Pants Without Sewing
Up Next
How to Make Homemade Clothes Look Professional >>
What other kinds of clothing repair have you encountered or used?

